SageMaker Guidelines
SageMaker Studio Lab (SMSL) Account
- Request a free AWS Sagemaker Studio Lab account at https://studiolab.sagemaker.aws/requestAccount.
- The request might take 1-5 business days to get approved, so request the account at least 1 week in advance.
- Use your UNH email (not USNH email) to set up your account. We recommend you also use your UNH password so you will remember it more easily.
- Upon account approval, create account using the link in the approval UNH email.
- Check your UNH email to sign into into your account.
- You will need a US phone number for verification purposes when you first log in.
- Login to Sagemaker Studio Lab https://studiolab.sagemaker.aws/login.
- Start runtime
- Select GPU or CPU compute type based on the lab/project requirement
- Once GPU/CPU selected, open the project by clicking on the open project button.
Launch SMSL Terminal
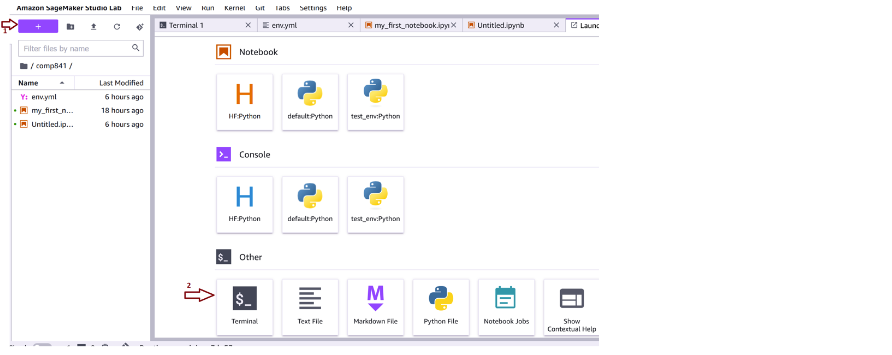
- Click on the SMSL new launcher (+) icon
- Select and click on Terminal from Other section.
Create Project Folder
In the terminal verify that you are in the default user folder
with the pwd command. If not, change directory to the default user folder and create a directory for this course:
cd /home/studio-lab-user
mkdir comp841
GitHub Account and Authentication Procedure
Create a GitHub account using your UNH email if not already done. It is recommended to use the UNH firstname.lastname as your GitHub username.
To access GitHub private repositories, GitHub requires users to authenticate using dual-factor authentication.
GitHub uses 3 different authentication procedures:
- Personal Access Token (PAT)
- GitHub Credential Manager (gcm)
- GitHub CLI (gh).
Two protocols, HTTPS and SSH (secure shell protocol), are used for authentication.
For SageMaker Studio Lab (SMSL) authentication with GitHub, we can use either the HTTPS protocol (with GitHub CLI gh tool) or the SSH protocol (with openssh utility).
GitHub Personal Access Token Authentication
Follow instructions in class to:
- Get your Personal Access Token (PAT) from GitHub
- Save it in a text file on your laptop
- Authenticate to GitHub by entering your PAT when prompted to enter a password
GitHub SSH Authentication
In the SageMaker Studio Lab (SMSL) terminal, run the following command to install ssh in SMSL:
conda install -c conda-forge openssh To use SSH, you need to add an SSH key as shown on this page: https://docs.github.com/en/authentication/connecting-to-github-with-ssh/generating-a-new-ssh-key-and-adding-it-to-the-ssh-agent
Once the SSH key is added successfully, then create config file inside the ~/.ssh folder:
cd ~/.ssh
touch config
Open the file config with the nano editor:
sudo nano config Write the following 4 lines in the config file:
Host github.com
Hostname ssh.github.com
Port 443
User git
In the SMSL terminal, execute the ssh command to check if you can connect to github.com using the SSH protocol:
ssh -T git@github.comYou are all set to git clone, git push, or git pull using the SSH protocol.
GitHub CLI Authentication
See Medium post by Austin Lasseter at https://austinlasseter.medium.com/cloning-your-first-repo-to-amazon-sagemaker-studio-lab-992dc7a8c72, section Storing your Github token on SMSL for future use.
Note that in this course you are not forking the labs in your GitHub account. Instead, when you accept the GitHub Classroom invite, GitHub automatically forks the lab into the GitHub org for the course, where you can access it and clone it.
Local GitHub settings
Once you have your GitHub account, run below commands from terminal:
git config –global user.name "enter your GitHub username"
git config –global user.email "enter your UNH email"
Clone Project from GitHub to SageMaker Studio Lab
To clone the git repository inside comp841 folder, in the SMSL terminal:
- first
cdinto comp841 using commandcd comp841 - and then run the
git clonecommand with TWO arguments:
git clone <url of lab repo> <lab short name>where <url of lab repo> is the HTTPS URL of the GitHub project repo, and <lab short name> is the name the repo will have in your SMSL account.
- For example, the remote repo called lab3-mihaelasabin, will have the short name lab3.
Create Conda Environment from the .yml File
- We can create a new virtual environment through the provided .yml configuration file.
- Make sure you are in the SMSL default virtual environment (studiolab) BEFORE creating new virtual environment.
Use the command given in the README.md file to create and activate a new virtual environment, specific to the lab.
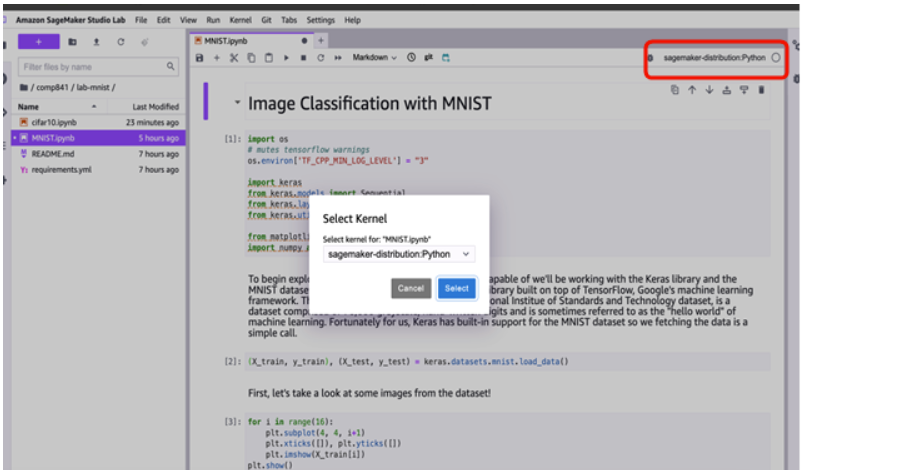
Once activated, open your ipynb file.
Go to kernel in the top right corner and select the environment you just created previously from the dropdown menu.


Execute your lab.
References
GitHub: Using SSH over the HTTPS port. https://docs.github.com/en/authentication/troubleshooting-ssh/using-ssh-over-the-https-port

